Half-season review: The Flames’ penalty kill (Part 1)

By Mike Pfeil
6 years agoSo we’ve finally crossed the halfway mark of the season and after much turmoil the Calgary Flames’ penalty kill appears to be trending back from the dead. Despite their early season success there were underlying signs that the whole thing was destined for an implosion (which happened, as predicted).
Let’s establish a few basics while keeping in mind that PK% is a blended metric accounting for any PK at any strength (3v5, 4v5, etc.):
- Through the first half of the season they sat at a miserable 25th place at 78.8% efficiency.
- Since then they’ve moved up to 18th with a 79.9% success rate, which on the surface is a small step in the right direction.
With those basics established we need to keep in mind that the confluence of factors that led to the rise, demise, and sudden rebirth are all linked. The problem is that current public analysis still has a number of unanswered questions. Like the previous work I’ve done we’ll try to shed a little more light on 4v5 play and hopefully get closer to those answers, though the research doesn’t ever end.
Neutral zone forecheck formations
Let’s do a quick refresher for any newcomers or anyone who is a little rusty on the different types of forechecking options I’ll be examining here.
The Flames’ de-facto forecheck is a Passive 1-3 formation (tracked instances: 195 times). There’s a lot of tangible rationale behind this choice, primarily with player positioning in most cases to help mitigate power play breakouts.

The F1 has a similar role to the wedge +1 in the defensive zone in that they can apply pressure when they’re confident they can force a play, a turnover, or the puck carrier to regroup. F1 will retreat looking to close a gap, attempting to funnel the puck carrier to one side of the ice. F2, along with D1 and D2, need to be cognizant of players getting behind them for stretch plays that can then quickly become on the rush chances.
Everyone at the blue line needs to be confident in attempting to suppress the entry or be prepared for a dump-in. You can see video of it in action (and working) here.
Following behind the passive 1-3 the Flames used the Retreating Box forecheck formation (tracked instances: 119 times). It’s really just as it sounds: a literal retreating box that is atypically down the middle of the ice.

F1 can force the opposition’s breakout (if the option permits) and skates backwards up the ice. F2 follows in unison on the opposite of the ice while D1 and D2 can tighten up the middle portion of ice. Once the puck carrier crosses the blue line, the forwards can force the carrier to his backhand. In many cases for the Flames, I’ve observed players trying to break in up the middle which can be suppressed as well.
Two examples of it working successfully (and one of it failing) can be found here.
Finally, we’ll touch on the third more common formation in use (we’ll touch on Tandem Pressure further down), which is the Same-Side Press (utilized a mere 19 times):

In this forecheck option, F1 and F2 are primarily using angles and indirect pressure to angle the puck carrier into the boards. The press part comes when F1 and F2 function in a pincer-attack to force the puck carrier to dump in the puck or a turnover. D1 and D2 can be flexibly used here, be it in the middle of the ice to cover for anything up the middle. D1 is ready for puck retrieval depending on a dump in or a timely turnover in their general proximity, and D2 is ready to challenge the far side if the flow of play moves that direction.
Charlie O’Connor, now of The Athletic Philadelphia, has a wonderfully detailed analysis of the Same-Side Press along with other formation materials here that I recommend reading.
So with recommended material to supplement this piece and some basics covered, let’s dive into the data side of things.
Formation usage and their impact
| Formation | Times Used | Breakup% | Carry-In% | Dump-In% | ZEFR Against% |
| Passive 1-3 | 195 | 24.10% | 61.03% | 13.85% | 37.95% |
| Retreating Box | 119 | 19.33% | 61.34% | 15.13% | 39.50% |
| Same-Side Press | 19 | 36.84% | 36.84% | 26.32% | 31.58% |
| Tandem Pressure | 9 | 66.66% | 22.22% | 11.11% | 44.44% |
Note: My defined parameters for breakups right now are forced offsides, entries broken up, and turnovers created when a breakout/entry was attempted. In some later updates I’ll have this data broken down even further.
As you can see, the Flames stick to two formations 91.8% of the time, with some similarities, but a general overall message that things need to change here. Despite 4.77% difference in terms of breaking up entries, the overall carry-in percentage is the same.
The one other positive is the overall ZEFR% drops a bit with the Passive 1-3 utilized vs the Retreating Box option. ZEFR% accounts for on-the-rush chances created after entering the zone and/or setting up into power play formation and getting a shot attempt off.
On the lesser-used end of the spectrum everything is a wash due to the incredibly small sample size. The one positive you can get from them – if there truly is one – is that they have been effective in their extremely finite deployment. There is an extreme need to see the Flames’ PK elect for more direct pressure options like Tandem Pressure over a reliance on waiting for trigger points and then activating on them in the two most commonly used options.
Zone entries against: A crime against nature
Zone entry prevention has been the nagging problem all season for the Flames at 4v5, which reached its height around the 20 game mark. Over the last 21 games things have improved slightly, but remain a concern. Part of this comes with the indirect pressure approach to managing play as it comes through the neutral zone, the other part comes from not directly attacking the power play they’re up against.
With that said, when regarding the Flames’ raw counts of entries against, tracking gives us a richer perspective on how their PK is slowly coming back to life:
- 237 controlled entries against (136 of those were in the first 20 games, 101 in the last 21 – so it’s improving, slowly!)
- 130 entries prevented/broken up/forced offside (51 through the first 20 games, 79 entries broken up in the last 21 games – a nice improvement overall)
- 57 dumped-in entries against (21 in the first 20, 36 in the last 21 – a steady improvement)
When the Flames are dialed in and being effective in making it next to impossible to enter the zone it’s a thing of sheer beautiful. In game 41 against the Anaheim Ducks we see it on full display for fans to marvel at:
Failed to load video.
The second side of this zone entry conundrum is the rate of shots generated from controlled and dumped-in entries. It’s been a well-established principle that controlled entries lead to more shots while dumping the puck in requires recovery or a turnover followed by getting the shot off.
Here are the Flames through 41 games played at 4v5:
| Entry Type | Shots Per Entry | Fenwick Against Per Entry | Corsi Against Per Entry |
| Controlled Entry | 0.49 | 0.65 | 0.79 |
| Dumped In | 0.22 | 0.26 | 0.37 |
All of this makes perfect sense so far, right? It’s a no-brainer that a team allowing controlled entries is going to see more shots against than a team allowing dumped-in entries.
The need for continued improvement in terms of zone entry suppression has to continue for the second half of the season.
| Entry Type | Shots Per Entry 1st 20GP | Shots Per Entry Last 21GP | Fenwick 1st 20GP | Fenwick Last 21GP | Corsi 1st 20GP | Corsi Last 21GP |
| Controlled | 0.51 | 0.46 | 0.66 | 0.62 | 0.82 | 0.74 |
| Dumped In | 0.24 | 0.22 | 0.24 | 0.28 | 0.24 | 0.44 |
Overall there have been very mild improvements on controlled entries and limiting shots. Every bit helps, but finding ways to solve this could be a valuable underlying component to a strong final half and push towards the postseason.
This particular facet of the PK is going to be a focal point of future analysis on my part in determining if there are additional factors contributing to these results.
Suggestions for the next 41 games
Nothing is perfect and the Flames are a far cry from where they were last year, but these are the first three things that come to mind in areas of improvement when you account for the data we have here:
Unit Adjustments, in relation to neutral zone results: This will be the focal point of a third piece in this series that I hope to work with Ryan Pike on. There are some worthwhile suggestions or options to be explored when you account for how a player like Mark Jankowski has fared so far; Sam Bennett, like last season, continues to showcase extremely promising value at 4v5; and to a lesser extent Garnet Hathaway has impressed, despite some scant usage.
Spoiler alert: Jankowski and Bennett are worthy of more usage and ice time at 4v5.
Drawing Penalties, a true power play killer: One area that will see increased exploration in this project that also doubles as a suggestion is the emphasis of drawing penalties while shorthanded. Through 41 games played the Flames were 17th at 4v5 penalty differential (nine taken, 12 drawn) and sixth in penalties drawn, which could be a huge increase in overall PK success if they can find ways to put themselves in position to draw a penalty.
The big sticking point on this is studying what penalties have a higher likelihood of being called and finding a way to avoid putting themselves at 3v5 by taking ill-advised penalties.
Increased Tandem Pressure Usage: This is when we discuss the defensive zone results and where the team is with respect to preventing shots/goals an overarching theme. From what we have available in limited tracking, both from this project and Charlie O’Connor’s work on the 2015-16 Flyers’ PK, there appears to be some value utilizing it.
Like Charlie found in his work with the Flyers, the Flames benefited from this formation, though it’s rarely utilized.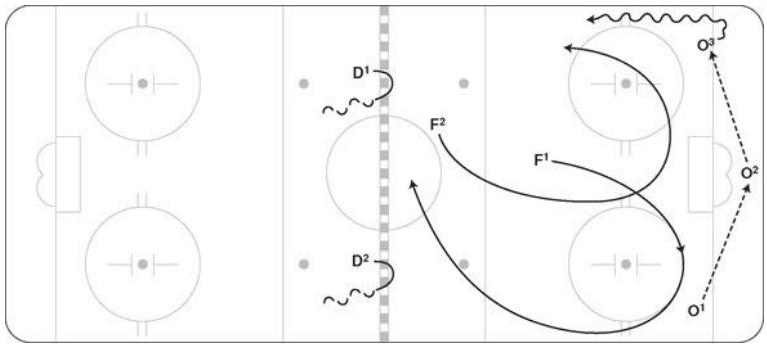 Its value is its ability to catch weaker power plays off guard on regroups, forcing turnovers which could lead to offensive zone chances, and eating time off the clock.
 Its value is its ability to catch weaker power plays off guard on regroups, forcing turnovers which could lead to offensive zone chances, and eating time off the clock.
The risks are not ignored and there are probably bullish individuals reading this now thinking it’s not worth it. The facts stand that in tracking what we have publicly available there’s a value in the risk/reward exchange of using it one out of five or one out of six times you’re forechecking:
Failed to load video.
Wrapping things up
First off, I hope that part one of this 41-game review has helped frame the penalty kill a little better for casual observers to more tenured observers, or those in between. There’s a few areas that I’ll have tweaked to illustrate the relationship even better come the end of the season. It’s important to me on a personal level that this type of analysis welcomes in everyone and hopefully bridges the gap or fosters a love for this aspect of the game that truly fascinates me.
One important improvement in future updates will be using Prashanth Iyer, Mike Gallimore, and Rushil Ram‘s Tape-to-Tape Tracker for all zone entries against at 4v5. The goal with this is to simply visualize where entries are happening, who is carrying them in, and give a more nuanced look into the Flames’ neutral zone approach. The other facet of this is tracking by formation used to showcase over a larger sample of a particular formation’s strengths and weaknesses.
Secondly, an incredibly important aspect to this project that I’m going to start work on is tracking specifics to the opponent’s power play. How are they attacking? Are they using a Dallas Cut to enter the zone? Are they using drop passes or bump-back entries?
This is the next layer of understanding the true effectiveness of a team’s penalty kill and I’m optimistic that it will give us a richer perspective on the symbiotic relationship in special teams, which I hope removes even more noise from this work.
One last point: All of the work I’ve done is a direct extension and built off of Charlie’s work that has been cited here. He laid the groundwork for evaluating penalty kills and without his work none of this is possible.
Tomorrow we’ll look at the defensive zone which will include a refresher, reiterate some takeaways from here, and then marry them with defensive zone tracking.
Recent articles from Mike Pfeil